
Lab Hints and Tips
Here are a few tips on experimenting and using the L a b Colour Mode.To change the image mode in Photoshop go to Image>Mode>Lab Color on the menu bar, you may be asked to Flatten the image if it has Layers in it. You have to say yes if there are adjustment layers as they can not be converted between one colour space and another. Changing colour modes will always (normally very slightly) change the tones and/or colours of an image (but you will be hard pressed to see it).
If you have not curved a colour channel before (i.e. just used the master RGB curve), then I think you will find Lab much easier than RGB as tone and colour are separate and you only have to think of 2 colours, instead of 3 (+tones), when you move the curve. However it will take a bit of experimentation and practice to curve successfully, but if you want the best for your images, then it is worth the pain/cost of learning it.
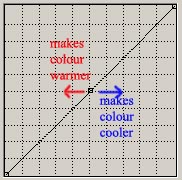
When you adjust the a or b colour channel curve, remember that...
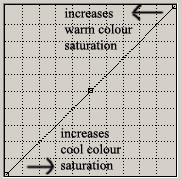
| To increase colour saturation | To alter the colour hue | |
 |
 |
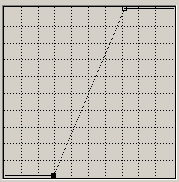
You will find that moving the centre point (0,0) is very sensitive and may best be done with the arrow keys, because the colours are bunched up around the neutral mid-point (check this out using the Levels histogram) and rarely extend beyond +/- 70. It is also helpful to make the curves dialog as large as possible, by click the bottom right 'size' icon.
|
Colour saturation:- Steepening both the a
and b channels or use my LabColourSaturation action and adjust Opacity |
|
Can I suggest for your first trial run, that you change the same image in both RGB and Lab to compare the differences. So duplicate the image (Image>Duplicate...), change the original using RGB, then change the duplicated copy to Lab mode, make changes and then compare them. Lab will excel with images that need a fair amount of correction, but not be worth using if only small adjustments are needed.
The following compares some aspects of changing an image...
| Adjusting | RGB | Lab |
| Shadows | better for minor changes | generally better |
| Highlights | better for minor changes | much better, especially if blown |
| Neutrals | use for multiple colour casts | same as RGB if only one colour cast |
| Overall brightness | better | |
| Saturation | miles better |
From a colour correction standpoint, although RGB does not excel in any particular adjustment, because brightness and colour information are mixed together, it is still a good all-around correction space - especially if the image is 'roughly' okay.
Lab provides almost perfect separation of brightness and colour information.
This allows fine control over highlight and shadow, plus the ability to adjust
very large colour casts and dramatically increase saturation. Because it
occupies such a large colour gamut, it is an excellent colour space for
correcting large colour casts, and neutralizing or otherwise altering the shade
of a single colour. Lab is a poor colour space for subtle colour
adjustments, or for neutralizing two or more shades of colour. Lab excels
at distinguishing shades of green foliage.
The a and b channels of Lab are good sources of masks for
separating uniquely coloured objects because they depend on hue only, and will
therefore trace a true outline of an object in variable lighting.
Here are a few facts...
Skies are -b
blue and -a green
Grass is -a green and +b yellow
Think about
placing centre
points on a and b curves before mouse-ing for colour change
Fine tuning Highlights and Shadow best left for RGB
Lab is not so
good with distinguished colours
The L
channel curve is good when want contrast in a strong colour
Use BlendIF if
necessary to restore colours after Lab ab steepening
Break greens
apart (we do, cameras don't) by having a steeper a than b curve.
For portraits,
especially light skin, then the b curve should be steeper than the a
curve by almost a factor of 3