|

| |
|
Colour Watcher - Display Modes
You can decide which Values, of the 4 colour spaces, are to be displayed
in the body of the Watcher and also in the Window's Caption bar (which is
the value copied to the clipboard, when pressing Control+C). You can also
specify which visual displays are to be shown.
|
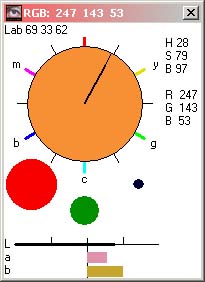 |
This snapshot shows that 3 display types have been
requested, starting from the top, they are... - The Hue clock
- with the hand pointing at the Hue value (0 - 360 degrees) and the
length of the thick part of it indicating the Saturation value.
The Brilliance is not displayed diagrammatically.
- The RGB circles with the channels shown as solid circles of
colour. The size is the channel value and the colour of them are
the actual colour of that channel.
- Lastly the Lab bars channel values. The L value is the
black line. The colour channels are shown in their actual colours
and the length depicts their value (plus or minus either side of the
middle line).
|
| An alternative way of visualizing the Lab
channels is the Lab Clock, as shown opposite. These are shown
as little circles, joined by a thin line, on the two 60 degree axis -
Magenta<>Green and Blue<>Yellow.
Note that I have had to invert the 'a' channel direction to agree with
the Hue clock and so Magenta is on the left, but in the normal Photoshop
Curve dialog, Magenta is on the right (as it has +ve values).
|
 |
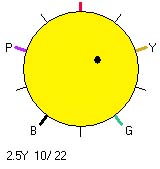
| The Munsell Clock has two aspects...
The actual Munsell colour is shown inside the pixel sampled colour in
the outer band.
The wee blob indicates the Munsell angle and the Chroma is
indicated by how near the wee blob is to the centre of the clock, near
the outside for Chroma 2 and at the centre at Chroma 50. I have done
this, in the reverse from expected point of view, as very few hues are
greater than Chroma 20 and I think the hue angle is more important for
us to see.
Note that the chances of the sampled pixel colour being exactly the
same as a Munsell swatch is pretty low.
|
 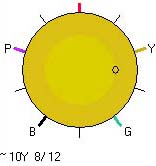 |
The Munsell value is shown... a) exactly or within
+/-1.5%,
as say 5R 2/4 or N 5/0
b) roughly, as ~2.5GY 6/8
c) out-of-gamut, as *5R 9/12 If the blob is solid then the
Munsell value is exact otherwise it is shown as a circle for cases b&c
above.
|
| The above screen snapshots are shown with a
large sized Watcher. The size can be changed using the Control and
plus/minus key (just like in Photoshop). The Munsell colour model is
defined as a set of distinct swatches. It is not continuous as the
computer colour spaces are.
| The Colour Watcher does not attempt to interpolate
between the swatches, but will find the nearest to the actual colour
being shown on the screen.
If you wish to know the interpolated value, then the program CMC
(use
to be free) will calculate it for you.
For instance CMC says that RGB 244,57,77
is 5.9R 5.15/17.04 compared to the Watcher's 5R 5/16. You can
see the Watcher showing the difference between the Munsell Swatch
and the screen colour. |
 |
| |
|
|
| Right mouse click on the Colour Watcher will invoke the
Menu. This is the menu structure relating to the display modes.
The key strokes (you normally do not need the Control key) act as a
toggle switch.
Most of the important settings are remembered in a small file (WatchColours.txt)
each time the program is closed down. |
 |
| Incidentally, you can have all the 3 clock displays
showing on top of each other, but it gets a little clutter in a small
window. You will have noticed that the angle of hues in the HSB and
Munsell colour spaces are different - for instance Green is 120° in HSB
and 144° in Munsell. It is quite instructive to have both displays
active and watch the difference as you sample colours. |
 |
|