|

| |
Colour Watcher - Working Modes
The Working modes of the Colour Watcher are
the normal dynamic mode with instant reading,
the static or captured mode,
fixed point sampling,
a magnifier (3 levels), and
setting Shadow & Highlight points.
These are demonstrated below.
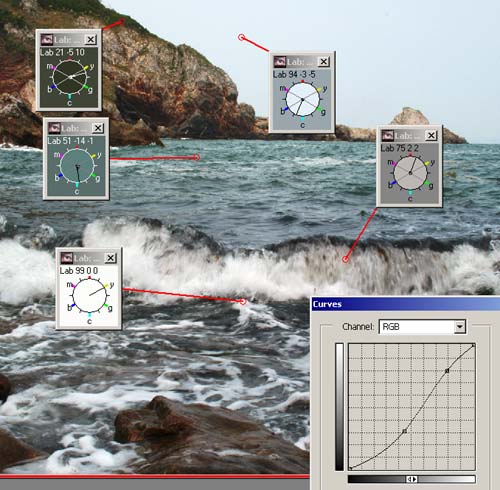 |
You can have a Watcher monitor the current colour under
the mouse, or you can run any number of them on stationary points -
providing you don't move the underlying image! When each Watcher Clock
is set to monitor a particular point, the outside of the clock is the
original colour and the current colour is shown in the middle. You
start/stop monitoring a fixed point by pressing the Spacebar.
To see the original values, press the 'q' key.
Opposite I've added a rather strong S curve (to demonstrate the change),
and I placed the watchers after setting White point, so I could show you
what the curving did.
This facility really becomes useful for removing colour casts and is an
absolute must (for me anyway) when using Jacob's Ladder. |
When you set the Black and White points using the
Droppers in Photoshop Curve dialog, there is no indication as to whether
you have selected the best point. But when you use the Levels dialog and
hold down the Alt key as you move the sliders, Photoshop shows you what
you are clipping. You can run my clock to give the same helpful
indication when Curving.
Setting black/white points does two things - corrects the colour cast of
the end points and sets the full tonal range of the image.
Either before or after you invoke the Photoshop Curves adjustment dialog
up, fire up the Watcher - by default it will float over the image.
|
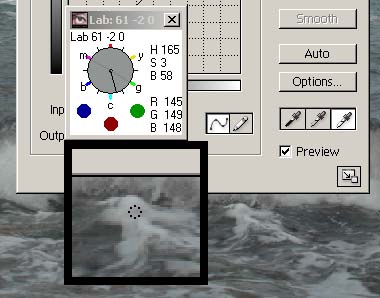 |
Opposite, I've placed it over the Curves Dialog and near
the wave where I want to set a White point - the Watcher includes an
optional small Magnifier of the area around the mouse (the mouse cursor
is not shown in these snapshots - but the little dotted circle shows
where it is). |
Now press W on the Watcher (for White point). In the
Curves dialog select the White Dropper and then watch the magnifier
display, which changes to show what will be clipped.
Opposite I've selected White point and am moving the cursor towards the
top of the wave. Any area that is not white will be clipped by Photoshop
and become white and thus detail will be lost - so move the point until
the display becomes as white as possible. That is then the best point,
so just click the mouse to set it. |
 |
 |
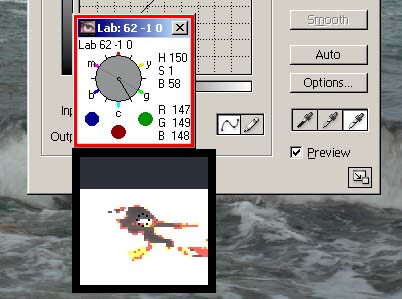
And opposite is the result of setting that point.
Normally one would just hit W again and the Magnifier would disappear,
but I've left it showing to demonstrate the result. You will notice
that Photoshop sets the individual channels to those values, correcting
both colour and tone.
Difficult to show on a web page, but these snapshots may help give
you the idea how good and simple this is. |
|
| |
|
| If you are setting the Shadow point (B key for
Black point), then any bit that has not gone Black will be clipped to
black and you will loose colour and tone for it. Pressing the S key
will Stop/Start the monitoring if, for instance, you wish to remember
a colour. This is different from fixed point monitoring that will
continue to show the colour changes.
There is a cautionary note: the Watcher picks up screen RGB values and not
the underlying image values and so there can be a slight difference
depending on your current profile - but luckily it is accurate on Neutrals
and Skin tones. You can check this out by firing up the Watcher and compare
the Photoshop values with it's values (place the Watcher near the Info
Palette and view an image at 100% with both set to a single pixel).
 |
|