|
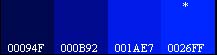
Colour Watcher - Tone Ruler I see the Rulers being used for fun and education as well as serious work - as with the Colour Watcher, there are a number of variations, so I've split the description into sections in the hope of making things clearer! It is important to remember, if you are using the Munsell renditions, that the ruler will only display the Munsell coloured swatches (displayed after pressing 'J'), not intermediate interpolations - i.e. the Watcher will not show 1.8GY 5.4/6.6, but instead the swatch 2.5GY 5/6. Ruler TypesThe idea behind the Rulers is described in the following three sections - it is probably easier to play with them before ploughing through all the options. i) The Zone SystemThere is controversy, in books and on the web, about how many digital zones there should be and their values. If you use the system, then you will have decided what you want to use. It is simple to define your own zone system for the Ruler which is constructed using the current pixel colour under the mouse. So pick a neutral colour if you want a grey scale ruler. This ruler is the 'standard' one with equally spaced zones from '0' to 'X'.
ii) Camera ExposureI am interested in the exposure latitude of my cameras and how many f-stops particular parts of the image are away from the actual exposure (0ev). I hope to become better at dialling in compensation values when using Spot-metering, by learning to see tones changes better. It is simple to construct your own Exposure Ruler (see this page). When you take the set of bracketed exposures of a grey card, you will find that they vary depending on camera settings, iso speed and lighting type. You can define up to 7 different Exposure Rulers (I suggest keys '2' to '8') - here are a couple of +/-4ev examples from my Nikon D700, both at 200 iso and minimum settings...
iii) Colour SaturationIn a nutshell, as the tones in an image become progressively darker, the colours should become less saturated. This had been realised by (master) painters for a long time. See the top of the page describing my research into this subject here. Photoshop (and any digitally generated) saturation change is done by formula, which does not correspond to how we see colours changing, and so the problem is how to de-saturate the darker colours to give the image a more (human) realistic rendition. Have you thought that when we lighten shadows, we should also change the colour saturation and ditto with highlights - but by how much? Setting the black and white end points or adding contrast similarly changes the saturation. There are two approaches and I have included a facility to quickly switch between them - press the '9' key toggles between the renditions - so you can easily compare them. - Normal (computer generated) colour tonesThe idea here is to reduce the effect of adding Saturation, by adding a Luminosity mask to the Saturation layer. By having a Ruler in that colour, one can check and adjust the mask to get the desired levels. - Munsell colour tonesThe changes in Saturation should follow the Frank Reilly model, which is specific to the Munsell colour space. By having a Munsell Ruler, one can adjust the colours by comparing them with the Swatches. In order to do this one may need saturation adjustment layers with tone masks. This is only practical for large areas of colour in photos where objects such as walls, grass and trees etc. dominate. Let me show you 3 examples - with the Normal (computer) ruler above the Munsell one...
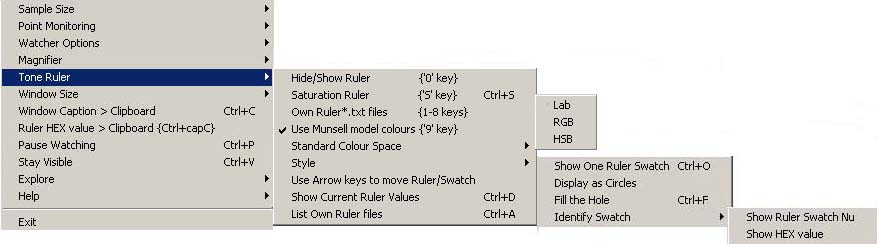
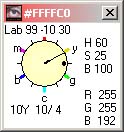
I think these examples, more or less taken at random, demonstrate that the Master Painters knew a thing or two. When we increase the saturation of an image, for more 'punch', we are likely to become a bit unreal unless we take care. Ruler StylesThere are two main styles - a strip or a single swatch - and you can quickly switch between them using the 'o' key. If you have one swatch visible, you can move from one swatch to the next by using the arrow keys. Using the arrow keys in strip mode will move the 'current' swatch (see below). You can have the swatches as squares or circles, either with/without holes and there are a number of size you can have. You can optionally identify each Swatch with a number (0-10), number + Lab value (useful for Zone and Exposure Rulers) or HEX value. Luckily the Hex value will just fit inside a square swatch! The 'current' swatch (only really important if you wish to copy the HEX value (Control+C )) is identified by a '#' or a '*' symbol above the hole. '#' denotes normal rendition and '*' Munsell. You can switch between them by using the '9' key. The Swatch values can be created using the Colour Space (Lab, RGB or HSB) that you normally use. If you create a Ruler for a particular value in each of the 3 standard Colour Spaces (something you would not normally do), you will notice that there may well be a slight difference between the swatches. The Tone Swatches are defined in terms of percentages. So, for instance, 50% is mid-grey RGB 128,128,128 but that is not the same as Lab Luminosity 50 (which is RGB 118,118,118). The same is true for coloured swatches. The default is Lab mode. The Ruler floats over the screen and you can drag it around with the mouse by clicking and dragging it - it is 'invisible' to most programs. Ruler MenusThere are rather a lot of options, but the style settings will be remembered between invocations of the Colour Watcher - so once you decide on the how you want to use them you can forget all the combinations! The Ruler can be controlled from the Colour Watcher, or from itself. If you want to change the colour of the Ruler then you must do this by hitting one of the keys '1' to '8', or 'S' (for Saturation) after you have positioned the mouse and the Colour Watcher is the Active window. The '0' key will toggle the Ruler off/on So I repeat... I would suggest that you use the keys 0,1-8 & S to interact with the ruler rather than the menu, because the Watcher program will be monitoring the pixel under the mouse - and who would want a ruler of the Menu colour!! The Colour Watcher's Menu
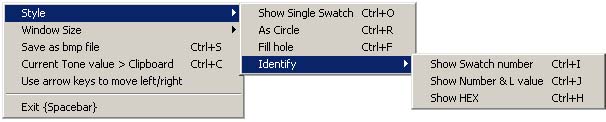
Note, use capital C and Control to copy the current Swatch HEX value to the clipboard - normal Control + 'c' (lower case) will copy the Watcher's value. The option to show the values of the Ruler's swatches ('D') and list the Ruler text definition files ('A') is only available from the Watcher's menu. The Ruler's Own MenuThe Tone Ruler's menu is invoked by right mouse clicking on it. There are 2 features that are not available from the Watcher's menu (the remainder are duplicated). Changing the size of the swatches and Saving the ruler ('s' key) into a .bmp file.
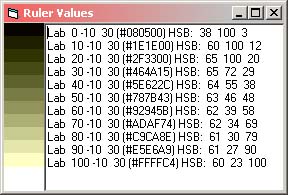
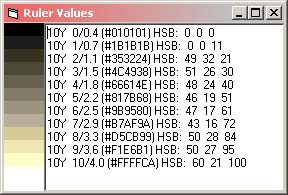
Note that you can use the Spacebar to remove a ruler (while it has focus). I chose that key in case the window beneath actually had the focus and I hope that a space would do less damage, to the underlying program, than any other key! Have a look at the Help page for a wee bit more information. ExperimentsIf you wish to start exploring the colours and tones using the Ruler, then there is an option (key 'D') to Show the Ruler Values in a separate real window (as the actual ruler swatches are invisible to nearly all programs!). Once launched, these windows are separate from the main program and will stay around until individually closed. Do be aware that when you save a Ruler in a bmp file, or via the Show feature, that on subsequent viewing the screen colours may be different depending on the rendition profiles of the program displaying them.
|
|||||||||||||||||||||||||||||||||
|
|
|||||||||||||||||||||||||||||||||