
Jacob's Ladder Actions
| The Actions are coloured in my usual way (see the Actions
page).
You only need to use the first 5 actions, unless you wish to experiment - but some of the remainder are needed as subroutines to the main actions. You may also need my standard actions if you wish to use the 'Manual By..' set. Remember that the Actions will give these sort of Layers... |
|

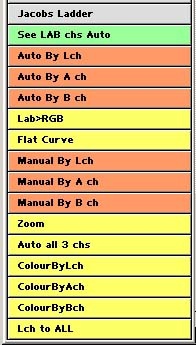
| See Lab chs Auto | Run this first to see which Channel to use as the Controlling channel. It will create a new window showing the 3 Lab channels side by side as they will be used in the following 'Auto By..' actions. Delete this image when you have inspected it. |
| Auto By Lch | These 3 actions will create the Layers using either the L, a or b channel to control the adjustments. They will give you the option of blurring the channel, which may be necessary for a or b, to get a smooth transition of colour. The actions include an AutoLevels adjustment on the controlling channel to make sure the entire width of the curve dialog is useable. If you do not like the result, then use the 'Manual By' actions. |
| Auto By A ch | |
| Auto By B ch | |
| Lab>RGB | This action will convert the Lab image back to RGB for you. |
| Auto all 3 chs | This action creates 3 sets of adjustment layers in case you need different controlling channels. Rus uses this, but being simple minded I tend to just play with one adjustment at a time. Note this must be started when the image is already in Lab mode. |
| Flat Curve | This creates a grouped Curve adjustment Layer and sets all the 3 channel curves as horizontal lines. |
| Zoom | This creates the (zoom) layer which is normally needed to allow sensitive adjustments. You will only start to play with this layer when you are comfortable with the technique. |
| Manual By Lch | These actions allow you to curve the appropriate channel, rather than have AutoLevels applied - useful for some images. Note it uses some actions from my standard set (CBactions) which must therefore be present. |
| Manual By A ch | |
| Manual By B ch |
| ColourByLch | These actions are present in case you want an addition Jacob layers based on the adjustments you have made so far - so the image will already be in Lab mode |
| ColourByAch | |
| ColourByBch | |
| Lch to ALL | Use this action if you want a different sort of controlling image (perhaps from RGB space) - place your chosen image into the L channel before running it. You will then need to add the Flat curve and Zoom layers. |
Download these Actions and have fun - if you get confused (like I do) adjusting colour, then use my Watcher as an Info Palette.
PS. This technique allows one do to something that was previously impossible to do in Lab mode - make multiple neutral (or any other colour) points for different tonal areas of an image!